
Step by step instructions to Introduce Stable Diffusion on a Windows PC

Stable Dissemination, the star of the computer based intelligence created symbolism world, resembles a computerized paintbrush that can change pixels into creativity. Nonetheless, dissimilar to most other famous simulated intelligence workmanship generators, Stable Dispersion is fairly trickier to utilize. It cannot be accessed by simply logging into a website, and it is not officially available as an app in your app store. All things considered, you should download and run the model locally on your PC. To assist you with that, we have arranged this nitty gritty aide making sense of how for introduce Stable Dispersion no matter what your innovative ability level.
What do you need to run Stable Diffusion on your PC?
The system requirements for running Stable Diffusion on a Windows computer are first. First things first, you’ll need Windows 10 or 11.
Then, you’ll require a NVIDIA illustrations card, ideally with 4GB or a greater amount of VRAM. Yet, don’t worry in the event that you don’t have a viable illustrations card! The option to “Use CPU” can still be utilized. The presentation with a computer chip won’t be really that smooth with a viable GPU, however it is a functioning arrangement regardless.
Continuing on, you’ll require 8GB of Smash — obviously, the higher, the better. Lastly, you’ll require somewhere around 20GB of free plate space. Consider this the backstage storage area for all the tools necessary for StableDiffusion to function locally.
Hardware requirements for Stable Diffusion (Windows):
- NVIDIA graphics card with 4GB VRAM (not required),
- 8GB RAM,
- and 20GB of free storage running Windows 10 or later (32-bit or 64-bit).
Get to know Godleak
Godleak crypto signal is a service which provide profitable crypto and forex signals. Godleak tried to provide you signals of best crypto channels in the world.
It means that you don’t need to buy individual crypto signal vip channels that have expensive prices. We bought all for you and provide you the signals with bot on telegram without even a second of delay.

Godleak crypto leak service have multiple advantages in comparision with other services:
- Providing signal of +160 best crypto vip channels in the world
- Using high tech bot to forward signals
- Without even a second of delay
- Joining in +160 separated channels on telegram
- 1 month, 3 months , 6 months and yearly plans
- Also we have trial to test our services before you pay for anything
For joining Godleak and get more information about us only need to follow godleak bot on telegram and can have access to our free vip channels. click on link bellow and press start button to see all features
Join for Free
☟☟☟☟☟
https://t.me/Godleakbot
Also you can check the list of available vip signal channels in the bot. by pressing Channels button.
However, these are only hardware and operating system requirements. As we get deeper into the “how-to” section, we will talk about the other requirements.
How to install Stable Diffusion locally on your computer: a step-by-step guide
Step 1: Install Python
We should start off the Steady Dispersion establishment by getting Python 3.10.6 (or higher) ready on your Windows machine.
The 64-bit Windows installer can be downloaded from the official Python website’s download section. Open the installer once it has been downloaded to begin the process.
A crucial point: Make sure the box marked “Add Python XX to PATH” is checked. Supplant “XX” with the rendition you are introducing — recall, it should be 3.10 or above. This resembles giving your framework a guide to Python, guaranteeing it knows precisely where to track down it.
Click “Install Now” with that checkbox selected.
Step 2: Install Git
Git will be downloaded and installed next. Start things off by exploring to the download segment of the authority Git site and downloading the Windows adaptation of the product. You will see two choices here, as displayed in the picture beneath — the independent installer and the versatile release. Until further notice, how about we adhere to the independent installer to keep things straightforward.
Open the Git installer and select “Install” after it has been successfully downloaded. From that point, follow the breadcrumbs spread out by the installer to wrap up the establishment cycle.
Step 3: Summon the command prompt interpreter
Begin by locating the Windows logo-emblazoned key on your keyboard. It’s normally settled between the Ctrl and Alt keys. Presently, press this Windows key and the ‘R’ key all the while. This will bust open a little window with a text field.
Type “cmd” here (without statements) and hit Enter. You have called the order brief application, and another window looking something like this will show up (the default text style tone is white):
Step 4: Clone Web-UI
Now comes the (slightly) tricky part. You’ll need to flex your command prompt skills here. Don’t worry if you have never done this before; it’s relatively straightforward.
First up, let’s ensure you’re in your home folder. Type “cd %userprofile%” (without quotes) and hit Enter.
(Quick tip: You can just copy-paste the command from here into the command prompt window — no need to type it all out).
The command prompt should now display something like “C:\Users\YOUR_USER_NAME>”
Note that “YOUR_USER_NAME” is just a placeholder here. In reality, this will show the specific username for your computer account. For instance, if your username is “Maggie,” it will display as “C:\Users\Maggie>.” Now, in our case, we’ve gone with a username that’s a masterstroke of creativity — drumroll, please — “user.” So “C:\Users\user>” is all we got.
Next, it’s time to clone the AUTOMATIC1111 repository, where all the Stable Diffusion files are. Type “git clone https://github.com/AUTOMATIC1111/stable-diffusion-webui.git” and press Enter.
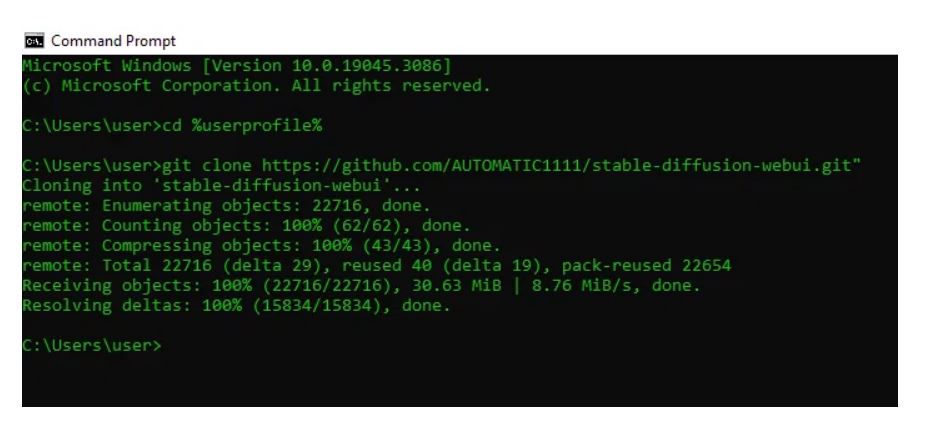
A folder called “stable-diffusion-webui” should now be sitting nicely in your home directory if everything is in order.
You can definitely relax in the event that you’ve cloned the storehouse in an alternate organizer rather than %userprofile%. Simply keep in mind the location where you put the “stable-diffusion-webui” folder.
Step 5: Download models
Begin by opening Document Wayfarer and going to the shiny new catalog. Enter “%userprofile%stable-diffusion-webui” in the address bar.
When you’re in the right organizer, view as the “models” subfolder and advance toward “Stable-dispersion.” Here, you’ll recognize a .txt document named “Put Stable Dispersion designated spots here.”
Next on the plan is downloading the Steady Dissemination designated spot record, variant 1.5. It is available for download on the HuggingFace website.
Step#6: Run Stable Diffusion via Web-UI
It is time to return to the folder labeled “stable-diffusion-webui.” Raise a ruckus around town button or just sort %userprofile%\stable-dissemination webui in the location bar to explore to the parent envelope.
To begin the installation, locate a file with the name webui-user.bat by double-clicking on it; wait a few minutes after the process begins.
After the establishment is finished, you will see a message directing you toward a neighborhood URL: http://127.0.0.1:7860.
After that, simply launch any web browser and navigate to the local URL http://127.0.0.1:7860. Stable Dissemination is currently at your beck and call.
Try it out by composing in a brief (like “a feline sitting on a seat”) and clicking “Produce.”
At the point when you’re finished, basically close the cmd window to switch off the program. Simply double-click the webui-user.bat file and navigate to http://127.0.0.1:7860 to use it again later.
How to install Stable Diffusion: additional tips
Error during installation
Imagine a scenario in which you hit a tangle during the establishment. Assuming you’re seeing blunders, it’s most likely in light of the fact that a more seasoned Python is hoarding the spotlight. All things considered, you’ll have to show it the exit. Go to the Control Board, select “Add or eliminate projects,” and eliminate the old Python form. Then, you’re good to go to introduce Python effortlessly.
At any stage, in the event that you are don’t know which Python variant is introduced on your PC, you can check it utilizing the order brief. To get to the order brief, give that Windows key on your console a tap and begin composing “cmd.” Enter “python” once the app starts up and press Enter.
This will show which Python adaptation is as of now introduced in your framework. As you can find in the picture beneath, I have Python 3.10.11 introduced. You will get a blunder message on the off chance that you don’t have Python introduced.
Improve performance
Hoping to give Stable Dissemination a speed help? The – xformers choice is one method for making it happen. What’s more, assuming your GPU’s VRAM is under 8 GB, consider flipping the – medvram switch. It lets you create more images at once and saves memory.
To empower these choices, right-click on the bunch document, webui-user.bat, and pick ‘Alter’ from the dropdown menu. ( You might need to click “Show More Options” first if you’re using Windows 11).
You’ll see a line that says:
set COMMANDLINE_ARGS=
You want to transform it to:
set COMMANDLINE_ARGS=-xformers – medvram
Once you’ve made the change, save and exit. Double-click the webui-user.bat file to get Stable Diffusion up and running with its new speed and efficiency settings.
The last byte
Furthermore, that’s it. You have now successfully installed Stable Diffusion on your Windows computer. Now that you have access to Stable Diffusion, you are prepared to investigate the infinite possibilities of artwork generated by AI. However, recollect, the nature of your manifestations depends on the nature of the prompts you feed the man-made intelligence instrument. Therefore, understanding the tool itself is just as important as mastering the art of prompting. Go ahead and out new methodologies as you proceed with your excursion with Stable Dispersion — the objective at last is to allow your innovativeness to stream and make your prompts exact.